
Your cart is currently empty
How I Photographed the Milky Way (Part 2)
October 12, 2018
Welcome to the second part of this guide on how I photographed the Milky Way. If you haven’t read the first part of this guide I would recommend you do so before reading this. In that part, I cover the equipment you’ll need as well as other considerations such as the location, weather, moon cycle etc. These will give you a good understanding of how I planned my photograph of the Milky Way.
In this part I am going to talk about:
- The location I chose
- Technique I used
- Planning my shoot
- Camera settings
- What I did on the night
In part 3 I will talk about how I bought all the images I took together, the software I used and how I edited the final image in Lightroom and Photoshop.
Let’s get into it.
Choosing my Location
I mentioned in part 1 that it is important to find a dark sky that isn’t ruined by light pollution. In the UK we don’t have too many of those, but one resource you can use is DarkSkyDiscovery. There are similar sites available for the USA such as dark sky.org and darksitefinder.com. Being located near London I was keen to see if there was a Milky Way grade dark sky that didn’t involve hours of driving. According to the Dark Sky Discovery website I was in luck, with Iping Common located under two hours away. I’ve put the location on Google Maps below:
The location itself was easy to find and has a free car park that you can use. From the car, you can go through the gates and into the common itself. It is a huge area of land, so I arrived while there was still daylight. By doing that I was able to scope out the area and find a good place to shoot from.
Techniques to Shoot the Milky Way
While researching how to photograph the Milky Way I came across several different techniques. These ranged from a single photograph to images created from more than 50 individual frames stacked together.
This list isn’t definitive but covers the most popular techniques I read about and have now tried.
- Single Photograph
- Composite Photograph
- Stacked + Composite Photograph (Recommended)
- Panoramic Photograph
Single Photograph
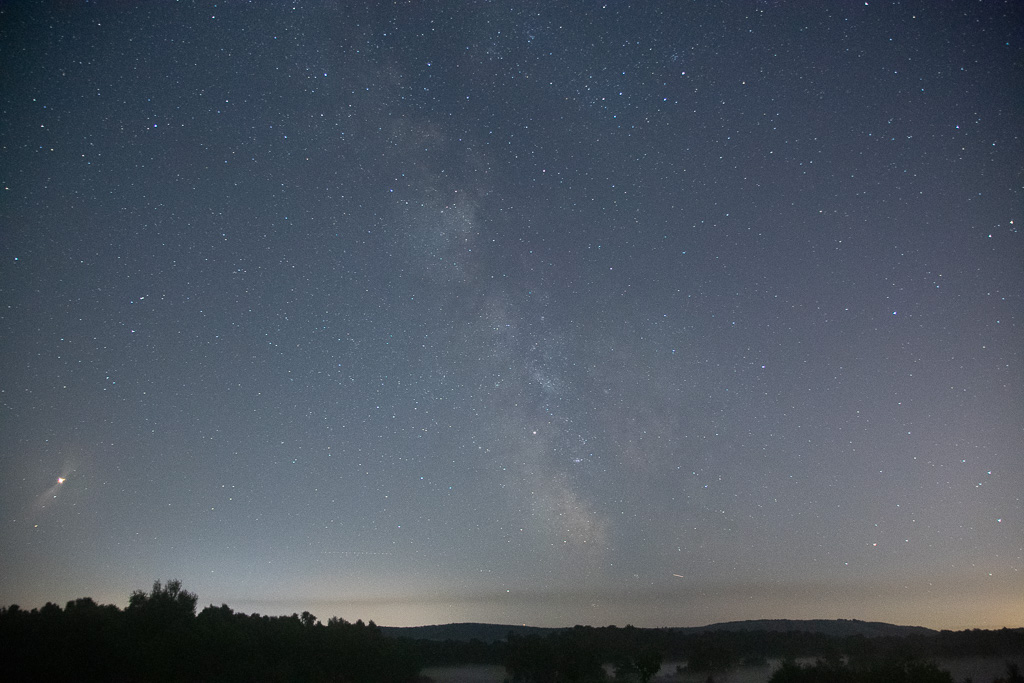
The easiest method of taking a photograph of the Milky Way but one I’ve found gives the least pleasing results. When taking a photo of the Milky Way you will need to use a high ISO. But by using a high ISO you will introduce noise into your photograph. I’ve posted a single exposure from my shoot below and you can see a significant amount of colour noise. There are methods you can use in both Photoshop and Lightroom to reduce this noise. Yet, in my experience, I don’t find this works very well as they also reduce the detail in the Milky Way.
The second issue you will have is the foreground. As you are photographing at night, getting detail in your foreground as well as the Milky Way is difficult to do in one shot. There are a few ways you can get around this. One of these is to select a night with some moonlight. The side effect of this is you’ll lose some detail in the Milky Way as the moonlight will cause the sky to brighter. Another is to do light painting on your foreground subject. This is cool to do if you have a definite subject like a tree or something close in the foreground. The downside is it might take you a few attempts to get the light coverage right.
Composite Photograph
For simplicity, I have split composite photographs up into two parts. The first is a simple composite which contains one photograph of the foreground and one of the Milky Way. The second is a photograph made up of 1 image of the foreground, but a series of stacked photographs of the Milky Way.
A composite removes one of the disadvantages of single exposures by splitting up the photograph into two parts. This allows you to use the perfect settings for both the foreground and Milky Way. As you are no longer concerned by star trails on your foreground shot, you can use a much longer exposure and a smaller aperture. This will allow you to get a sharper and better-exposed foreground.
A few things to mention here:
- If you want to combine the images, you need to use the same composition for both the foreground and the Milky Way.
- You can take the foreground shot before the light completely disappears (if you are patient enough!). This allows you more natural light to create a good exposure.
- While this method adds a sharp and well-exposed foreground, it still leaves the issue of a noisy Milky Way.
If you fancy something more advanced that will give better results, keep reading.
Composite + Stacking
This is the method I used to take my photo of the Milky Way. Before you get scared, this method isn’t hard and is well worth the effort. It takes some preparation, planning, and thought before you go out to take the photograph. I’ve posted below a comparison between a single image and a stacked image (both with no editing). You can see a HUGE different in detail and noise between the two.
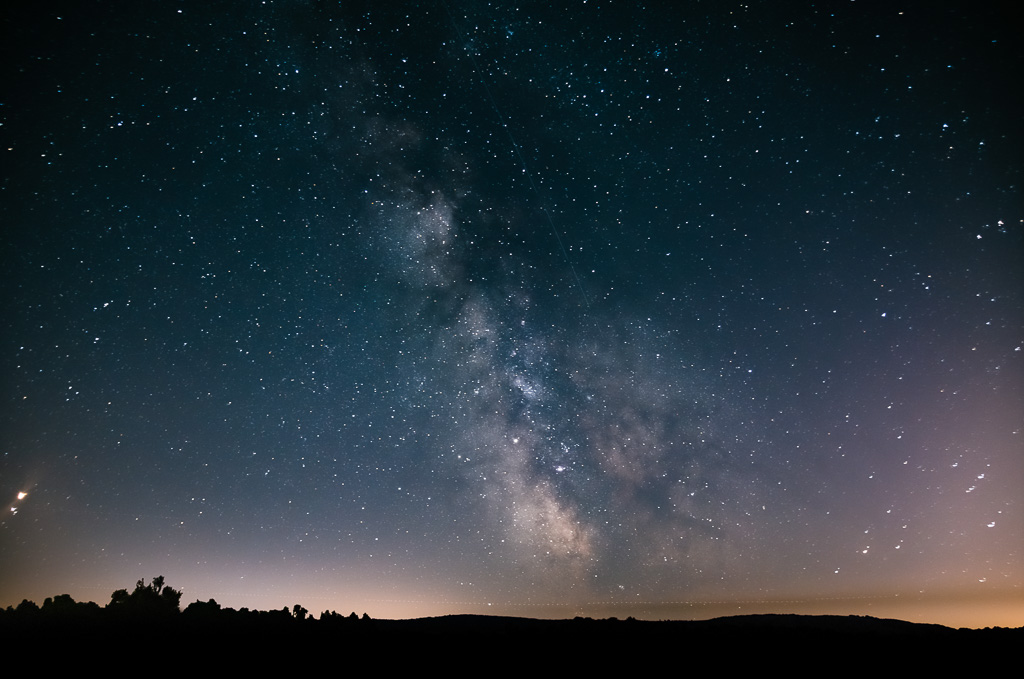
This method involves combining the nice foreground shot with a stacked image of the Milky Way. This stacked image of the Milky Way contains up to 50 photographs using 4 distinct image types. The great thing about this method is that while it reduces noise, it also increases detail. As I’ll explain below the process takes a little bit of planning, but the results are worth the effort.
The Process
As mentioned above this stacked photograph contains more than 50 images across 4 distinct types. So what are they?
Light Frames – These are your actual photographs of the Milky Way. They must be a series of images taken throughout the night with the same composition.
Dark Frames – These use the exact same settings as your Milky Way images but are taken with the lens cap on. These frames remove noise associated from long exposures. They must be taken on the same night as your light frames. This is because the ambient temperature affects the noise your camera sensor produces. We want to match the dark frames to the light frames so the noise removed correctly.
Bias Frames – A series of images that will remove the electrical noise created by your sensor when you take a photograph. To take a bias frame, set your shutter speed as high as it will go and use the same ISO and Aperture as your light frames.
Flat Frames – These frames remove vignetting and uneven illumination in your light frames. One of the suggested methods on how to take these is on the DeepSkyStacker. It suggests covering the lens (or telescope) with a white T-Shirt and using an external light source such as a torch to illuminate it. Use the same ISO as your light frames. Exposure time is worked out by the camera (use aperture priority mode).
To combine these different frames together there are several programs you can use. If you are using a Mac I’ve seen people talk about Starry Landscape Stacker which costs £38.99 from the App store. As I am on Windows I opted to use a free program called Deep Sky Stacker which does the same thing. From reading the guides they both appear to work in a similar way. But since I used DeepSkyStacker I am going to focus on that for these posts.
Once I figured out the different types of frame I would need to take I began to plan how I would do the shoot on the night. I decided that addition to my light frames I would take dark and bias frames. These would both aid in reducing noise in the final image. As I wasn’t using a telescope and knew I could correct vignetting in Lightroom, I opted not to take flat frames. That could have been a mistake and caused a few issues in the final photograph which I’ll discuss later, but until I’ve tried this technique I can’t say for sure.
Planning my Shoot
Before I get into how I approached the shoot, I want to go over setting up and some camera settings to take note of:
Tripod – As I discussed in Part 1, you need to be using a sturdy tripod. I am using a Manfrotto Element which is incredibly sturdy as well as light for the price (£89).
Focusing – As you are shooting into the dark sky you are not going to be able to use autofocus, so manual focus is a must. There are a few ways to do this. If you have an infinity symbol on your lens you can rotate the focusing ring to this to focus to infinity. Another method involves using live view and focusing on a very bright star. You can then fine-tune your focus until the star is crisp. I have an infinity symbol on my lens but this hasn’t been accurate for astrophotography. Because of this, I opted to use the live view method.
Manual Mode – For all the settings you use to take these photographs, you want to be using manual mode. This will allow you to dial in every setting yourself. Don’t be alarmed if you see the camera telling you the picture will be underexposed, this will not be the case.
Focal Length – For the Milky Way you need to have your lens at the lowest focal length it offers. With a normal kit lens, this is around 18mm. For the Sigma 17-50mm lens I am using, I would use 17mm.
Aperture – Like with the focal length, you need to be using the largest aperture your lens offers. A typical kit lens is around f3.5 at 18mm. For the Sigma 17-50mm lens I am using, the max aperture is f2.8. If you have a lens that opens wider than this such as an f1.8 lens, then I’d suggest that you use that if possible.
RAW – I recommend that you take all your photographs in RAW, but for the Milky Way this is even more important. It will give you so much more control in post-processing and preserves all detail. Make sure this is selected in-camera.
Long Exposure Noise Reduction – I recommend turning this off if you are attempting the stacked + composite method. The stacking of the images you take will remove the noise from the final image so there is no need to do this in-camera. Another benefit of turning this off is that you won’t have to wait after every exposure for the camera to perform this function. This means you can get through your frames a lot faster.
Getting my Composition
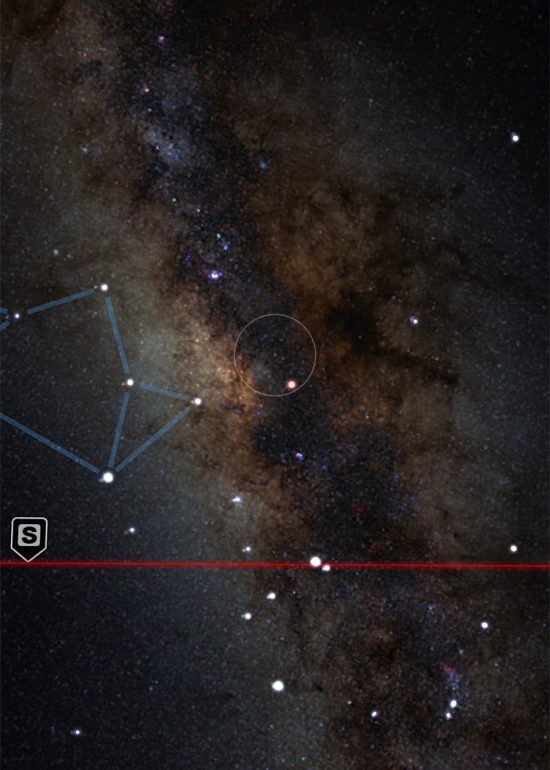
When I turned up at Iping Common, parked up and began to make my way into the common my first thought was “Ok, where is the Milky Way going to be?” That was quite a difficult question to answer when there was still daylight. For me, it was even more so as I had never seen it before.
Luckily, I had found an app called SkyView which solved the problem for me. What it allows you to do is pick a time of day with the calendar and see where things will be in the sky at that time. Using the AR feature I was able to look around the sky at 11:00 pm and see exactly where the Milky Way would be. This allowed me to include it in composition ready for when it became dark. Once you have found your composition you are in it for the long haul. Set up the tripod, camera and get your shutter release ready and sit back and wait for the Milky Way to appear.
Camera Settings
There is no “perfect” setting that will always get you a great photo of the Milky Way. But, there are some rules you should follow. These will allow you to get a base for your settings and tweak as required by the conditions. Before we get into these rules, let’s look at our settings for the foreground.
Foreground
Disclaimer before I discuss this. I screwed up the foreground on the night which is why it is a silhouette in the final photo. I arrived around an hour too late to take a lit foreground shot. As advised above, make sure that you arrive while there is still some daylight so you have a chance to explore.
From a camera settings perspective, you want to treat this as you would any normal landscape photograph. This means using a low ISO, a smaller aperture (f4-f8) and a longer shutter speed if the light is fading. The aim here is to capture a detailed foreground to compliment your Milky Way image.
Rule of 500
The rule of 500 is one of the most important rules when it comes to photographing the stars. What this rule tells you, based on your camera and lens, is the maximum shutter speed you can use. What do I mean by maximum? As we all know, the Earth rotates around its axis once a day. As the Earth rotates the stars appear to move across the sky. What the maximum shutter speed refers to is the amount of time you can keep the shutter open before the stars begin to blur. Now, why is this important I hear you ask? It is important because we want the stars to be pin-sharp and not streaky lines.
Here’s a closer look at the rule of 500:
Shutter Speed = (500 / Focal Length)* Crop Factor
Let’s break it down. The focal length refers to the mm setting on your chosen lens. If I am using my Fujinon 16-55mm F2.8 set at 16mm, 16 would be the number I would use in this formula.
The crop factor is specific to the size of the sensor in the camera you are using. Full frame cameras have a crop factor of 1 due to the sensor being the same size as a 35mm piece of film. APS-C or crop sensor cameras have a crop factor of between 1.5 and 1.6 depending on the brand. In Micro 4/3s cameras, the crop factor is usually 2. If you are unsure of what type of sensor your camera has, Google is your best friend here.
I’ve created a table below to show some examples of the formula in action:

As you can see from the table, the combination of camera and lens can have a dramatic effect on the shutter speed. Full Frame cameras allow you to have a longer shutter speed when compared to crop sensor cameras. But paired with the right lens, a crop sensor camera can achieve a comparable shutter speed. In the 12mm example above, the APS-C camera achieves the same shutter speed as the full-frame camera.
Camera Settings for Stacking
Light Frames
Using the rule of 500 we can work out the maximum shutter speed we can use. Now we need to figure out the rest of the settings we’ll use for our light frames. A good place to start is with your aperture. We want to get as much light into the camera as possible to get the detail from the Milky Way. So start with your aperture as wide as it will go. On a kit lens, this will usually be but if you have a faster lens with an aperture such as f2.8 use that.
The last element to decide is what ISO should be. As you are capturing light that has travelled trillions of miles to Earth you are going need to increase your camera’s ISO. The best way to figure this out is by trial and error, so take some test shots. Start at ISO 800 and plug in the rest of the settings and take a few shots. Look at the Milky Way and see if you are capturing enough detail. If the Milky Way is quite faint and you are struggling to make it out, move up to ISO 1600 and then ISO 3200 while keeping all other settings the same. Once you are happy with the detail you are getting, you are ready to begin getting your light frames. Don’t worry too much here about noise, the post-processing step will remove the majority of this.
Dark Frames
This is going to be a very short explanation. The only difference between these and your light frames is that these are taken with the lens cap on. It is important that you take these after your light frames as they need to be at the same ambient temperature.
Bias Frames
These are also incredibly easy to take and do not need to be taken in the same conditions as light frames. To take bias frames, you need to use the same ISO and aperture as your light frames, but set your camera to its fastest shutter speed. For my Nikon D3400, this is 1/4000 of a second. These are also taken with the lens cap on as with the dark frames.
Flat Frames
Flat frames remove vignetting and uneven illumination in your images. They are more important for deep space astrophotography than the Milky Way. I never took flat frames for my photo but did experience some misalignment of the stars at the edge of the image. This was caused by applying lens corrections in Lightroom before stacking. I’ll talk more on this in part 3.
If you do want to experiment with flat frames they are straight forward to take. AstroBackyard has a great guide which you can follow.
Shooting the Milky Way
Are you still with me so far? Ok good. There is a lot of detail above but it will all become clear once I break the shoot down. So what did my shoot look like?
Well, once I had found a composition I liked I set up the tripod, mounted the camera and waited for it to get dark. It was quite a surreal moment when it was dark enough to see the Milky Way. I’d tried to photograph it a few times and failed due to the conditions, so this was the first time I had EVER seen it with my own eyes. I can’t describe the feeling of looking up and seeing more stars than I’ve ever seen before. It was quite humbling.
Test Shots and Focus
The first thing I did was set up my focus. After trying the infinity marker and taking some test shots, I realised my stars were will not sharp. At this point, I switched to the live view method which worked great. I started my light frames at ISO 1600, f2.8 and 20-second shutter speed. This didn’t give me the detail I wanted from the Milky Way so I increased my ISO 3200 and kept all other settings the same.
Final Settings & Capturing the Milky Way
Once I was happy with my settings my shoot ended up as follows:
Light Frames X20
- 17mm Focal Length
- ISO 3200
- f2.8
- 20 Second Shutter Speed
Dark Frames X20
- 17mm Focal Length
- ISO 3200
- f2.8
- 20 Second Shutter Speed
- Lens Cap On
Bias Frames X20
- 17mm Focal Length
- ISO 3200
- f2.8
- 1/4000 Second Shutter Speed
- Lens Cap On
And that is how I photographed the Milky Way. The final part of this guide will talk about using DeepSkyStacker to bring these frames together. I’ll also talk about the techniques I used in Photoshop and Lightroom to create the final image. If you have any questions or comments, please leave them below.
Support the Blog
The blog is something I write in my spare time as a way of sharing my photography and what I am learning with the world. Unfortunately, running this blog isn’t free but something I pay for. So, if you have enjoyed this content and have found it useful there are a number of ways that you can help support the blog. With your support I can keep producing content like this.
Amazon Affiliates – I am part of the Amazon Affiliates program which means if you follow my affiliate links and make purchases on Amazon, I made a small commission at no cost to you. If you need to purchase anything from Amazon, please use my links to Amazon UK and Amazon USA.
Buy a Print – I’ve made a small selection of my images available as prints which can be purchased here. Each print is produced on Fine Art photo paper and comes signed and numbered.
Make a Donation – If none of the above appeal to you, then you can make a small donation via PayPal here.

